
By Bonny Snowdon, coloured pencil artist and teacher. Updated September 2026.
If you’ve ever wanted to draw a fox and wondered where on earth to start with all that fluffy fur, I’m here to help. I’m Bonny Snowdon, and I’ve taught and mentored thousands of people around the world to draw realistically with coloured pencils. This little fox cub is one of my favourite pieces to teach, because once you know the order to work in, the fur stops feeling scary and starts being rather lovely to draw.
When I draw a fox, I always start with the structure. If the shape of the head isn’t right, no amount of beautiful fur will save it! From there, I draw the eye and the ear, build up the head and muzzle, add the white chin and chest, and then spend the rest of my time layering the fur on the neck and shoulders. The whiskers go in last.
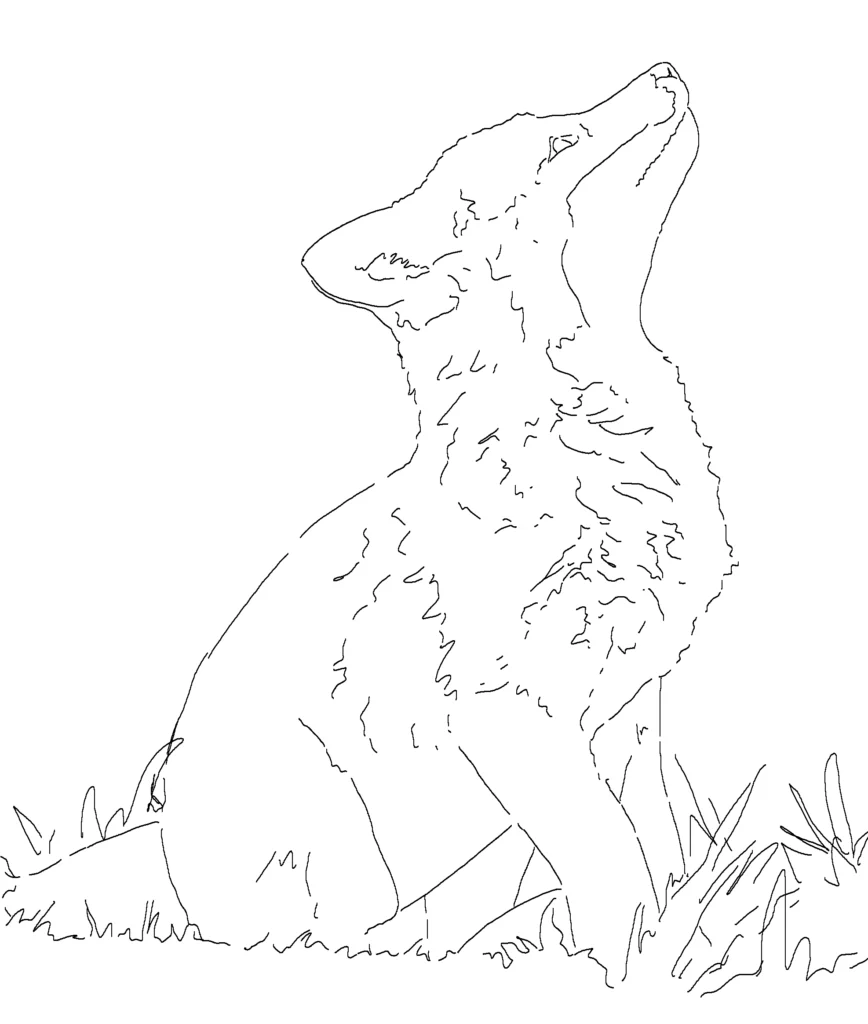
I’ll show you how to draw a fox step by step in exactly that order, and you can download my free line art and reference photo to work from as you go. If you’ve never drawn an animal before, the line art does the sketching for you, which makes this a far easier fox to draw than it looks. And if it all looks a bit of a mess halfway through, please don’t worry! It happens to everyone, and it usually means the layers haven’t all gone in yet.
Below, you can download your free fox line art and reference photo:


🎥 Watch these short videos to learn how to resize your line art and transfer it to your paper
Materials for this fox drawing
For this fox, I’m working on Clairefontaine Pastelmat. It’s a soft, velvety surface which holds an awful lot of layers, lets you put light colours over dark, and is very forgiving when something goes wrong. All of that makes it lovely for fur. If you’ve never used it before, it can feel a bit strange to begin with because it’s grainy and you have to really get into the tooth. Once you understand how it works, it’s a super surface to draw on.
Every pencil I used is in the materials guide below, and please don’t worry if you don’t have exactly the same ones. A near match will do the job.
- Clairefontaine Pastelmat, white
- Faber-Castell Polychromos for the browns, oranges and greys (burnt ochre, terracotta, dark sepia, walnut brown, caput mortuum violet, dark indigo, cold grey)
- Caran d’Ache Pablo for the lighter layers (ash grey, beige, cream, white)
- Caran d’Ache Luminance for a couple of the shadow colours (sepia 50%, cocoa)
- A kneadable eraser and a roll of Scotch Magic tape for lifting colour
- Cotton buds and a small soft brush for softening

How to draw a fox step by step
Step 1. Transfer the line art
Start by printing my line art at the size you’d like your fox to be, then transfer it onto your Pastelmat. If you haven’t done this before, I’ve written a little guide on how to transfer your line art to your surface.
Keep your lines nice and light. You’ll be lifting them out as you go with a kneadable eraser or a bit of Scotch Magic tape, and heavy lines are a real pain to get rid of. Before you pick up a coloured pencil, have a good look at your drawing against the reference photo. Is the eye in the right place? Is the nose long enough? Sort the structure out now, because once the fur’s in, it’s a lot harder to change.
Step 2. Draw the eye
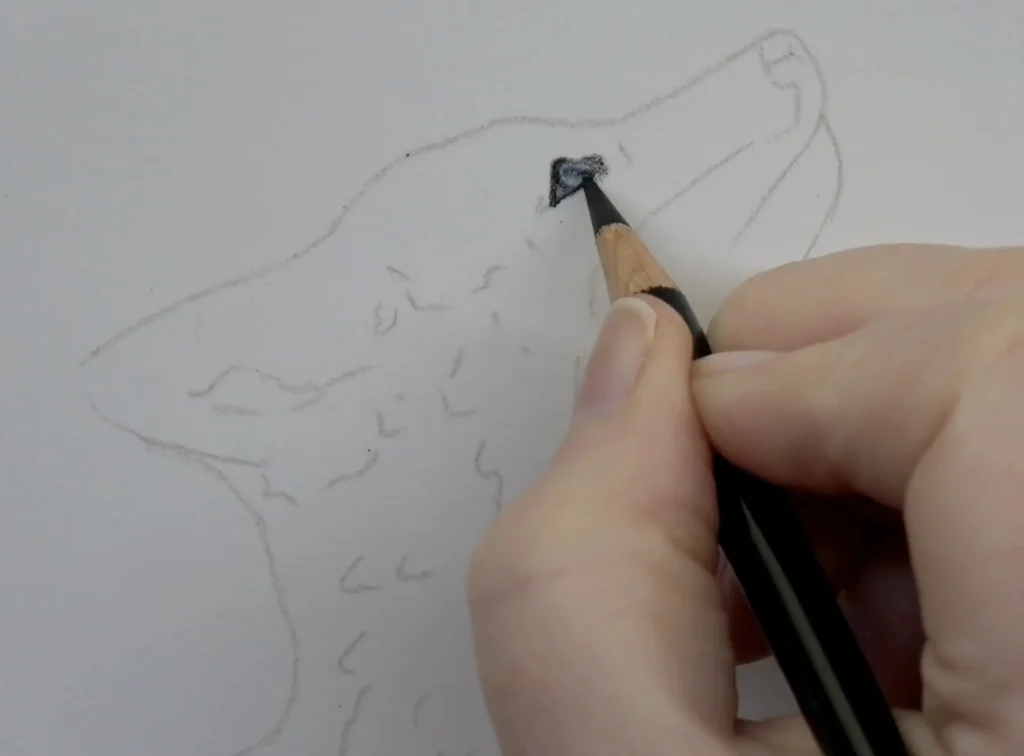
On any fox drawing, the eye is where I like to begin. Once it’s in, the rest of the face falls into place around it. Because we’re drawing the whole fox, the eye is only small, which means you don’t need lots of detail. Draw the shape carefully and make the dark areas nice and dark, and it will look lovely.
- Take your dark sepia (a lovely deep brown), and with really light pressure, draw the outline of the eye. Do this before you fill anything in, otherwise the eye can end up a funny shape.
- Go over the top eyelid again to thicken it up a touch.
- Fill the eye in with dark indigo, still nice and gently.
- Smooth it over with cold grey. You’ll notice a slightly bluey look to it, which is exactly what we want.
- Finish with a small amount of black at the front of the eye and along the top.
That’s the eye done! If you’d like to go a bit further with eyes, I’ve written about how to draw realistic eyes even when they’re small.
Step 3. Draw the ear
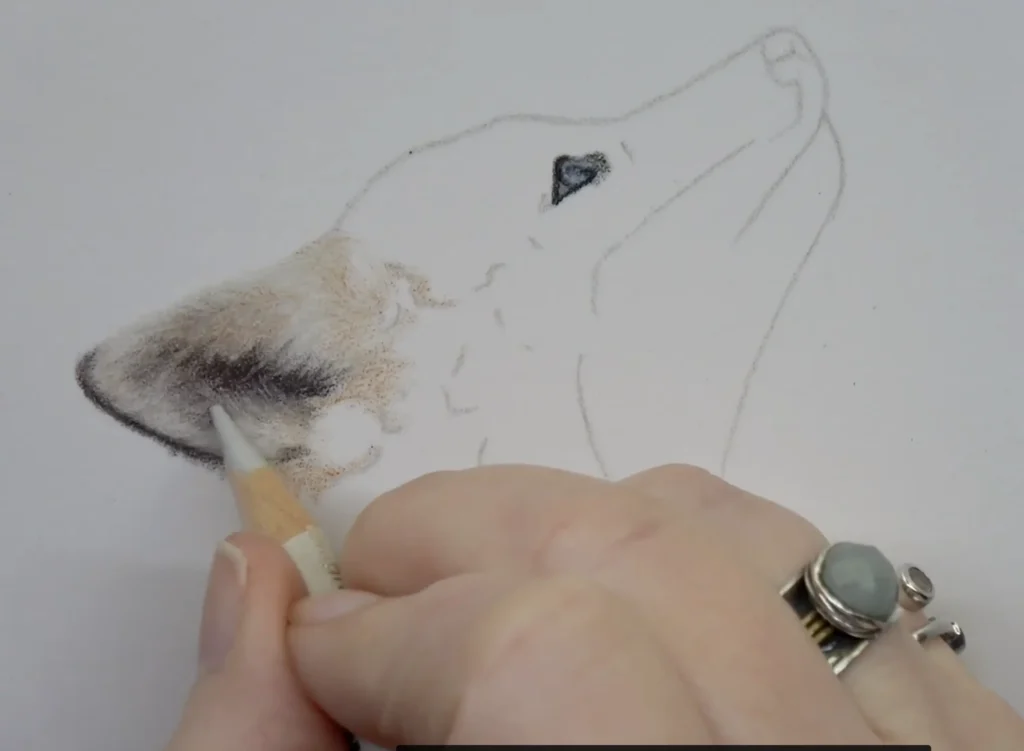
Now we can start on the fur, and the ear is a lovely place to begin. Have a look at your reference photo and you’ll see the fur fans out from the base of the ear, which is the direction your pencil needs to go in. Keep your pressure really light and don’t worry about it looking perfect. This is just layer one, and we’ll be adding plenty more on top.
- Take your kneadable eraser and gently dab out the line art at the top of the ear. Then, with your ash grey, sketch in the fur, following the direction it grows. Use little strokes, backwards and forwards, and keep it nice and gentle.
- Next, bring in a bit of walnut brown for the darker areas inside the ear and along the edge. It’ll look quite dark at this stage, but it will soften down as the layers go on.
- Go over the whole ear with beige. You’ll see it move the brown about and smooth it out, and it starts to fill the grain of the Pastelmat too.
- Now add burnt ochre to the warmer, orangey parts of the ear, and dark sepia right at the base, where it’s darkest. A tiny touch of caput mortuum violet in there gives it a bit of warmth.
- Knead your eraser into a point and lift out a few lighter hairs. Then take a cotton bud and gently soften everything.
- Finally, add a little warm grey and a few strokes of white Pablo for the palest hairs on top. Keep this really light, because if you press too hard, the white blends into the colours underneath and goes a bit milky.
If your ear is looking grainy, please don’t worry! That’s just Pastelmat doing what Pastelmat does. If you’d like more guidance, I’ve explained why Pastelmat looks so grainy when you start drawing and how to work with it.
Step 4. Block in the head
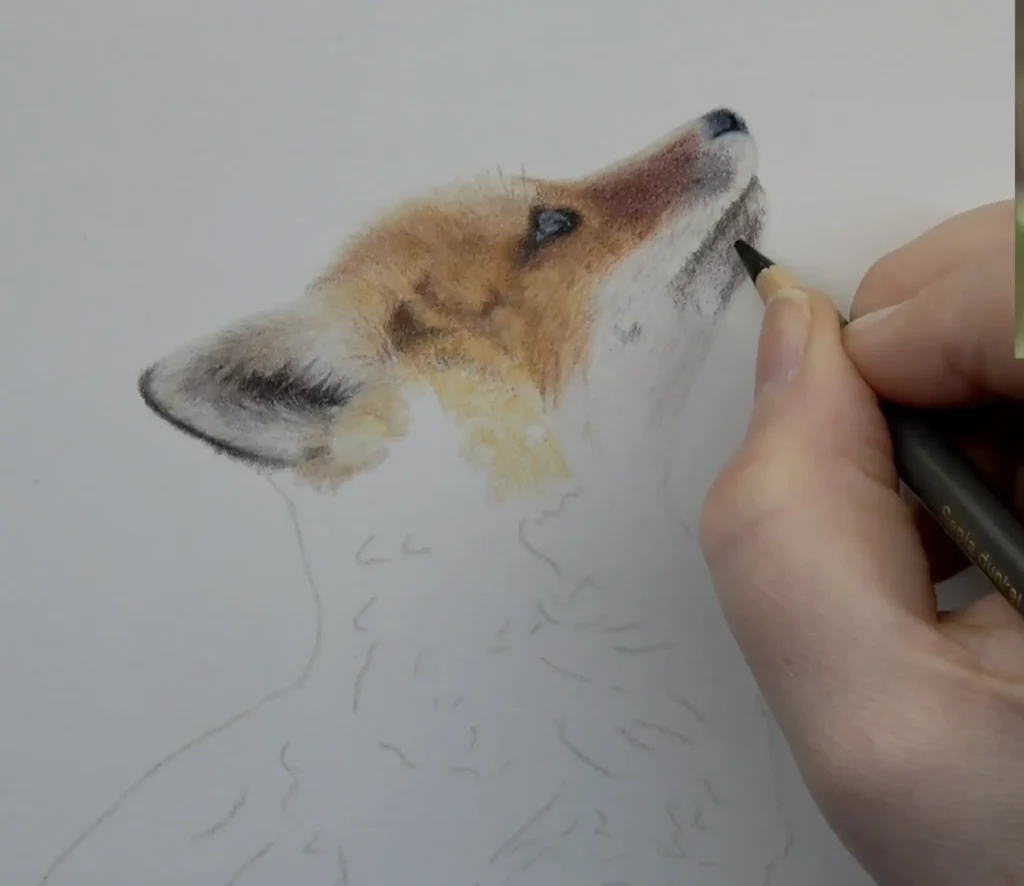
This is the part of your fox drawing where the little face really starts to appear. It comes together through layers of colour, one on top of the other. We’ll work from light to dark with soft pressure the whole way. After two or three layers it won’t look like fur yet, and that’s completely normal. Fur only appears once enough layers have gone in.
- First, use a small piece of Scotch Magic tape to lift the line art along the top of the head. Then take your burnt ochre and draw a soft, fuzzy edge just above where that line was. A real fox doesn’t have a hard outline, and this fuzziness is what makes the fur look realistic.
- Carry on with burnt ochre down the head, following the direction the fur grows. Above the eye, the fur is short and you can’t really see a direction, and in areas like that I go round and round with my pencil. You can read about the magic of round and round if you’d like to know why it works.
- Next, go over the top with orangish yellow. It smooths out the burnt ochre and brings in that lovely bright colour a fox has. Then, add cream in the paler areas to soften them.
- Now we add the darks. Take your walnut brown or sepia 50% and gently sketch small, soft shapes wherever you see shadow in the fur. Keep the edges of those shapes soft. Hard edges look like blocks, and blocks never look like fur.
- Bring terracotta over the top of the darks to keep the orange glowing through, then blend gently with a cotton bud.
- Finally, take your sepia 50% and a touch of caput mortuum violet and glaze in the darker fur around the eye, where a fox has a little mask. If it looks too red, don’t panic. Go over it with terracotta and the orange will calm it down.
When you blend, the head will look flat and the texture you’d built will seem to vanish. This happens every single time, and it’s why you keep layering. Each time you come back in, the fur comes back stronger.
Step 5. Draw the nose and muzzle
A fox’s muzzle is velvety rather than fluffy, which means we draw it differently to the rest of the face. Instead of little fur strokes, we go round and round with the pencil to build a soft, close texture. The nose itself is a small, dark shape. Because we’re drawing the whole fox, the nose is tiny, and it only needs a few layers and a nostril to look believable.
- Start with burnt ochre and work down from the eye onto the muzzle, going round and round. Leave the bridge of the nose paler, because it catches the light. Then bring in caput mortuum for the darker, warmer areas towards the nose.
- Before you go any further, check the structure against your reference photo. Mine ended up with a bit of a ski jump nose at this stage, and I straightened it with warm grey and a touch of cream. It’s always easier to change a shape now than after the nose has gone in.
- Go over the muzzle with warm grey to smooth the graininess, still round and round, still gentle.
- Now for the nose. Take your dark indigo and fill in the shape of the nose, then add a small nostril.
- Layer cold grey over the top of the indigo. This is light over dark, and it smooths the surface ready for the next layer.
- Go back in with dark indigo to deepen it, then use black for the darkest part at the bottom of the nose and inside the nostril. Each layer goes down smoother than the last, and it may take a few to get there.
- Finally, take sepia 50% and gently work the little cheek area that runs up to the lip, then blend the whole muzzle with a clean cotton bud.
If you’d like a closer look at how I build up a nose in coloured pencil, my guide to drawing a realistic dog’s nose uses exactly the same layering.
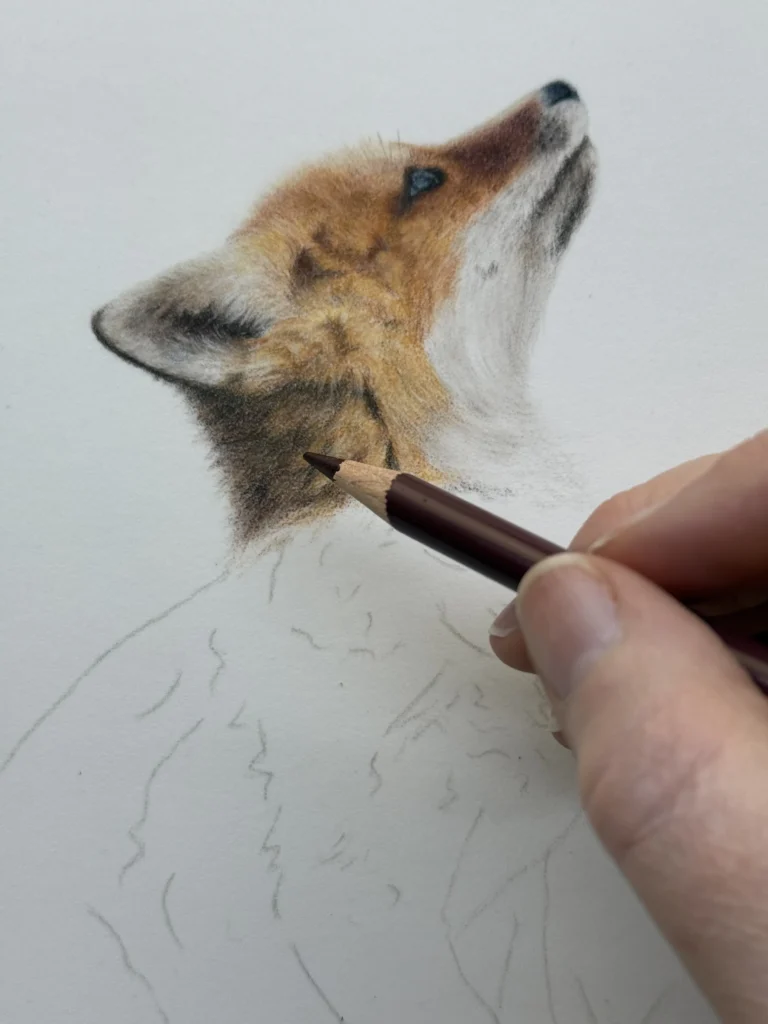
Step 6. Draw the white chin and chest
White fur is one of the trickiest parts of any fox drawing, because it’s never really white. If you look closely at your reference photo, you’ll see soft greys and warm browns all the way through it. We’ll build those in first. Once the darker fur goes in around them, the chin and chest will look lovely and bright without a white pencil going anywhere near them. It will feel too dark while you’re working on it, and I promise you it isn’t!
- Take your warm grey and go round and round over the lighter fur below the nose and along the chin. As you move down onto the throat, the fur becomes tufty. This is where you change to single pencil strokes that follow the direction of the hair.
- Next, use your Scotch Magic tape to lift the line art around the chin. We don’t want a hard outline there, and the whiskers will cover a lot of it later on anyway.
- Now take cocoa, a warm brownish grey, and draw the mouth. Instead of one straight line, sketch little hairs growing over it, which looks far more natural. Then use slightly firmer pressure to shape the lip and the corner of the mouth.
- Check where the mouth sits against your reference photo. On this fox it comes almost level with the eye, and mine wasn’t quite long enough to begin with.
- Bring cocoa and a touch of walnut brown into the shadows under the chin and where the white fur meets the orange. As soon as those darks go in, you’ll see the white start to look white.
- Carry the warm grey down the chest with soft, rounded strokes that flick off at the ends, then blend gently with a cotton bud, always in the same direction as the fur.
- Finally, dot a few whisker holes in with dark sepia, and use cream to smooth out any grainy patches.
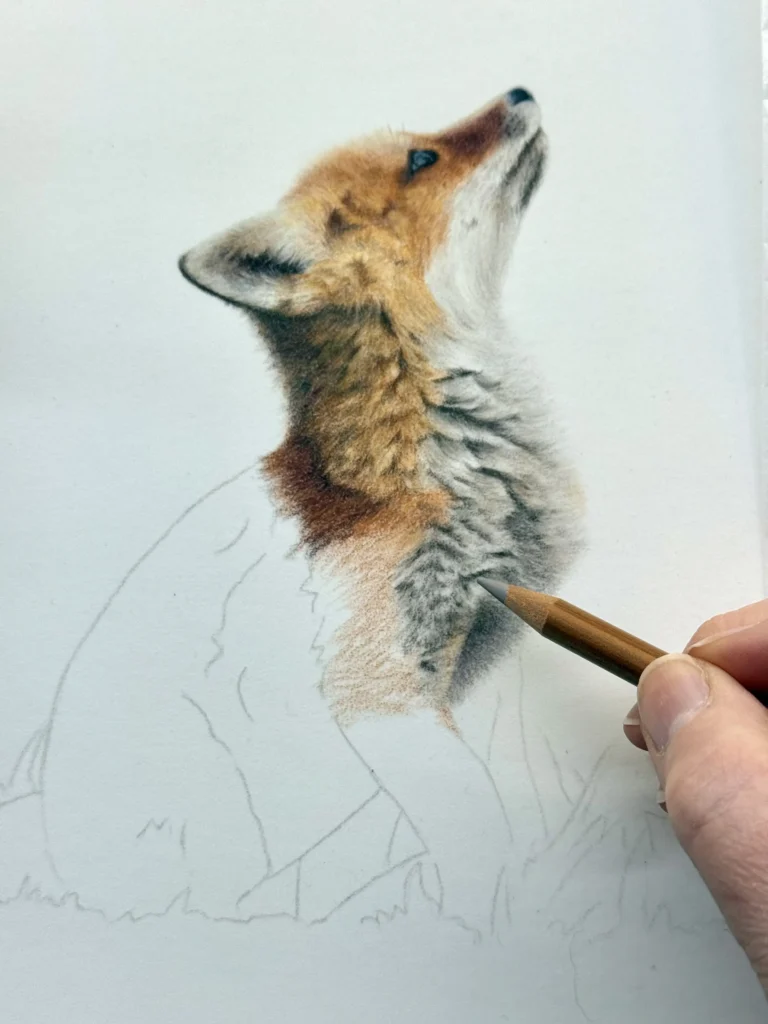
Step 7. Build the neck and shoulder fur
The fur behind the ear and down the back of the neck is the biggest area of fur on your fox drawing. It goes in lots of different directions, and there are some deep shadows in between. We’ll sketch it in loosely to begin with, then build the colour up in layers.
- Start with burnt ochre and sketch a rough layer of fur across the whole area, following the direction it grows. Behind the ear, where the fur points towards you, go round and round and let your strokes fan out from there. Lift the line art along the back of the neck with your tape as you go.
- Next, sweep orangish yellow over the top with long, light strokes. This fills the grain of the paper and adds the brightness you see on a fox.
- Now take your raw umber and begin plotting the shadows. Hold the pencil further back than usual and sketch small, soft shapes wherever the fur looks darker in your reference photo. Raw umber is a dull, greeny brown, and it sits nicely alongside the oranges.
- Use your kneadable eraser to lift out a few highlights, then go back in with burnt ochre to fill any gaps.
- Now we go darker. Take your sepia 50%, which is a soft purpley brown, and layer it into the deepest shadows behind the ear and along the back of the neck. I use this instead of grey or black because it keeps the shadows rich and stops them going muddy.
- Then, bring terracotta over the top to keep the orange showing through, and add a touch of caput mortuum violet for warmth. Soften the edges with cocoa and a cotton bud.
- For the very darkest areas, sharpen your black, press the point onto the paper and flick it upwards instead of shading. This gives you soft, hairy marks instead of solid blocks of colour.
- Finally, dab the whole area with a soft brush to blend it, then bring orangish yellow and cream back in for the lighter, wispier hairs.
If your fur looks blocky, don’t worry! It just means the shapes have hard edges. Soften them with a cotton bud and let the light and dark blur into each other. And if you’d like to see every pencil I reach for on a coat like this, here’s which coloured pencils I use for black and orange fur.
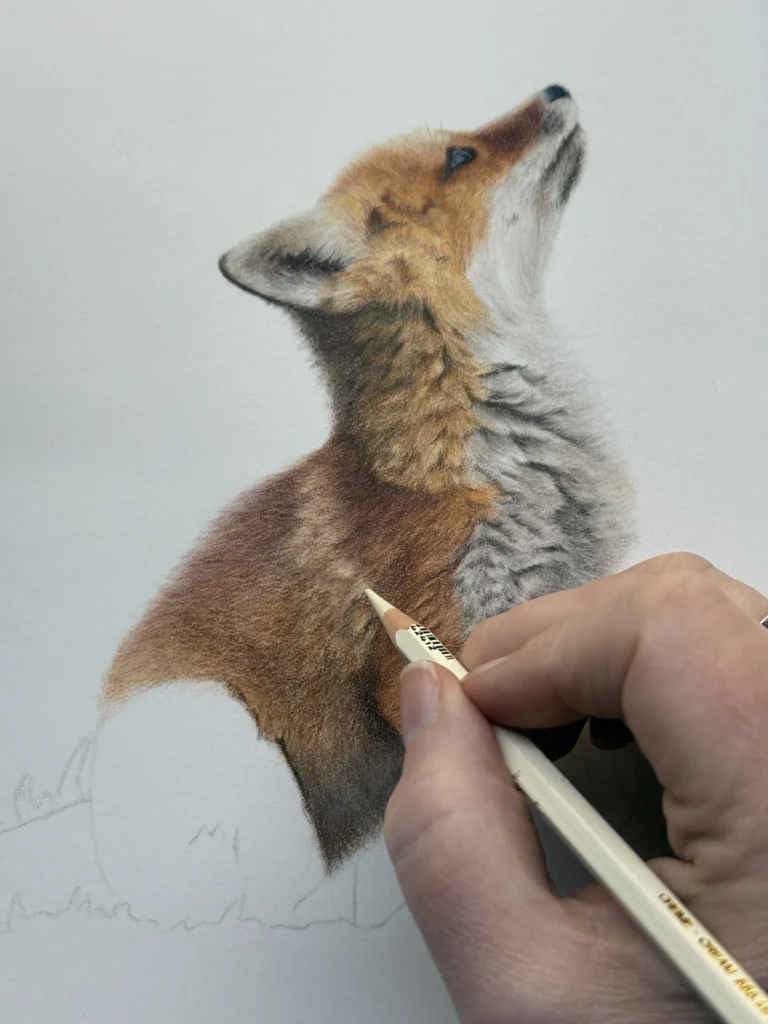
Step 8. Add the whiskers and finishing touches
I’ve left the whiskers until last for good reason. They sit on top of all the fur, and if you’d put them in earlier, you’d have drawn over them by now. They also hide a multitude of sins around the mouth, which is always handy! Once they’re in, we’ll have a look at your fox drawing as a whole and pop in a few last lights and darks.
- Take your dark sepia and dot the whisker holes in along the muzzle. Just press the point onto the paper and lift it straight off. Keep them a little uneven, because a perfect row never looks real.
- Now sharpen your white Pablo and draw each whisker in one long, light stroke, starting at the hole and flicking outwards. A fox has quite a lot of whiskers, and they don’t all go the same way. If you’ve ever struggled to get white whiskers to show up, this is my easy way to create white whiskers and it works a treat on Pastelmat.
- Add a few longer guard hairs across the top of the head with burnt sienna, following the direction of the fur.
- Go back to the ear and the top of the head with white Pablo and gently pull out a few of the lightest hairs. Nice and light with the pressure here, or the white goes milky.
- Finally, prop your drawing up and step back from it. Anywhere that looks a bit flat wants a touch more dark, and anywhere that looks heavy wants a touch more light. A layer or two in those spots and you’re done.
And there you have it, a realistic fox drawn in coloured pencil! If you’re anything like me, you’ll be tempted to keep tweaking. But once you look at it and feel that little glow of “I’m quite pleased with that”, put your pencils down. You don’t have to copy the photograph exactly either. It’s your fox, and it should look like your fox.
I’d absolutely love to see how yours has turned out, and you’ll find out how to share it with me just below!
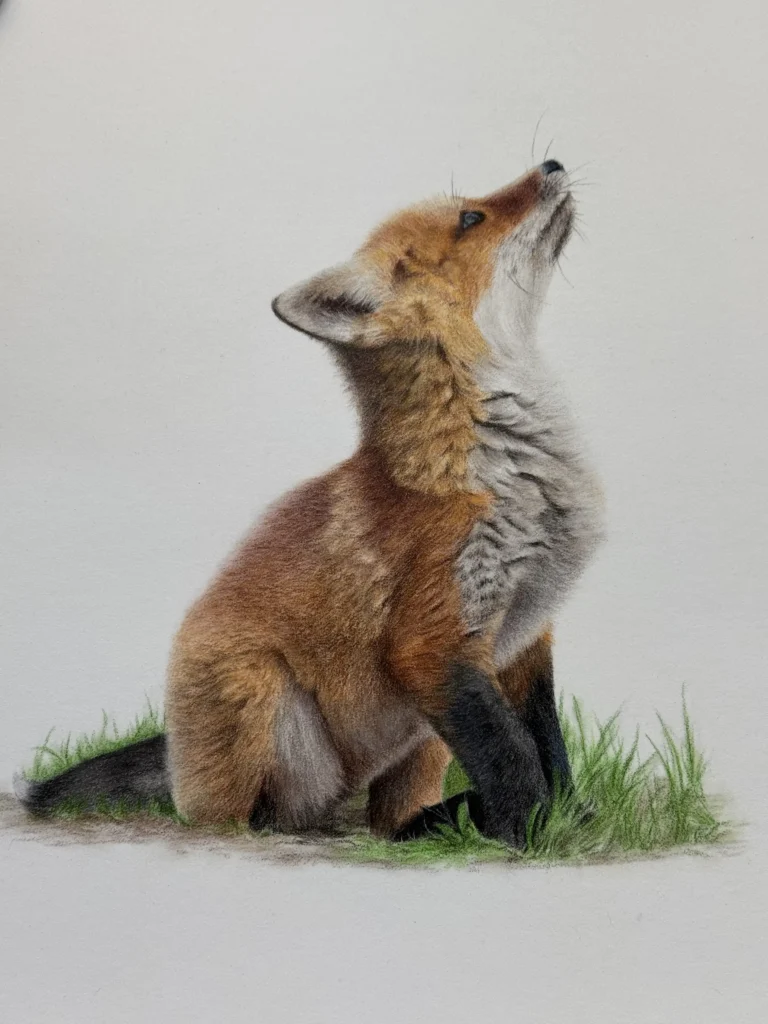
My tips for drawing realistic fox fur
Fur can feel overwhelming when you first start drawing it, and I completely understand that. It never looks like fur for the first few layers, and it’s very easy to decide you’ve done something wrong. Usually, you haven’t. Below are the things I remind myself of every time I draw fur, and what to do if your fox isn’t quite looking how you’d like.
- If your fur looks flat, you haven’t got enough layers in yet. Two or three layers on Pastelmat never look like fur. Keep going with light pressure and it will start to appear, usually just after the point where you’re ready to give up.
- If your fur looks stringy or scratchy, your pencil is going against the growth. Look closely at your reference photo and follow the direction of the hair with every stroke. Where the fur points straight at you and you can’t see a direction, go round and round instead.
- If your fur looks blocky, the shapes have hard edges. Fur is made up of little shapes of light and dark, and they need to run into each other. Soften every edge with a cotton bud or a soft brush and the blocks will turn into clumps of hair.
- If your fur looks muddy, you’ve used grey or black in the shadows. Swap them for a purpley brown like sepia 50% or caput mortuum, and the orange will stay rich and glowing.
- If your fox looks washed out, the darks went in too late. Put your darkest darks in early, even though it feels wrong, because the light areas only look light when there’s something dark beside them.
- If your drawing looks awful halfway through, you’re exactly where you should be. Every piece has an ugly stage, and it’s simply the point where the layers aren’t finished. I’ve written about how to cope with the ugly stages of a drawing, because it catches every single one of us!
For anything furrier than a fox, from spaniels to long haired cats, my guide to how to draw realistic fur with coloured pencils goes through each type of coat.
Draw the fox with me
If you’d like to watch me draw this fox cub rather than follow the steps on the page, the first two hours of my free fox cub tutorial are yours to watch whenever you like. You’ll see every pencil stroke in real time, and hear me talking you through the fur as I go.

I’d absolutely love to see how your fox has turned out, too! Come and share it in my free Facebook community, where you can ask me questions, get feedback on your drawing and see how other people have drawn theirs. Nobody there will judge a wonky nose, I promise. And if you’d like more coloured pencil tutorials to work through after this one, my free resources are a lovely place to start.