


By Bonny Snowdon, coloured pencil artist and teacher. Updated November 2026.
Drawing cat ears can feel really overwhelming when you see all those little white hairs. If you’ve ever wondered how on earth you’ll get them in, I promise it doesn’t have to be difficult!
To draw realistic cat ears with coloured pencils, press the fine hairs into smooth paper with an embossing tool or a sharp white pencil first, then layer your colours over the top. This is called indenting. As you colour, your pencil skips over the pressed lines, and the white hairs appear as if by magic.
I’m Bonny Snowdon, and I’ve taught and mentored thousands of people around the world to draw realistically with coloured pencils. I made this lesson for anyone who’s new to pencils. You’ll only need a handful of colours and some smoothish paper like hot pressed watercolour paper, and you won’t need an eraser or a knife at all.
We’ll begin with a little practice on a scrap of paper, then work on the ear from my video in gentle layers until it starts to take shape. You can download my free line art (an outline of the ear to trace) and the reference photo I drew from, and draw along with me. And if your cat ears drawing looks messy on your first few tries, please don’t worry! Mine looks a little bit messy too, and it’s still a really sweet little ear.
Below, you can download your free cat ear line art and reference photo.
Here’s my video if you’d like to watch first, or you can pop it on and draw along with me. It’s about 36 minutes long, and you’ll see me draw the whole ear in real time.
What you need to draw realistic cat ears
To draw realistic cat ears the way I do in this guide, you’ll need my free line art and reference photo, smooth paper, some coloured pencils, and something to press the hairs in with, like an embossing tool, a wooden clay tool or a sharp white pencil.
Indenting is a technique for smooth paper, and I wouldn’t use Pastelmat or drafting film to draw this ear. Hot pressed paper (paper with very little texture) is a nice surface to work on, but whatever smooth paper you have will do. Your pencils don’t need to match mine either, and anything close to these colours will be absolutely fine.
- My free line art and reference photo. You can download both just above.
- Smooth paper. I used a Stonehenge Multi pad, which has a few different paper colours in it and isn’t expensive, but even computer paper will work.
- Coloured pencils. I used Faber-Castell Polychromos for most of this ear, with Cold Grey (a pale bluey grey) for the first layer, and Burnt Ochre 187 and Raw Umber 180 for the warm colours. For the darkest hairs, I used a darker brown and Black 199, then a pink and a mid grey inside the ear. For burnishing (pressing hard to squash the colours into the paper), I used Caran d’Ache Luminance Buff Titanium, which is a soft creamy white.
- An embossing tool. A small metal tool for pressing the hairs into the paper. Mine has a fine tip at each end, one about 1mm wide and one about half a millimetre.
- A wooden clay tool. I pressed in the hairs on this ear with mine, holding it like a pencil. I bought a pack of four or five for about £5.
- Something from around the house. A sharp white pencil, a hair grip, a nail or even your fingernail will press the hairs in nicely. Avoid anything with a blade, like a scalpel or a Slice tool, because it will cut the paper.
You’ll find more about the pencils and papers I use in my materials guide. And if you’d like to see what else indenting can do, I’ve shared my tips for using an embossing tool to draw realistic leather.
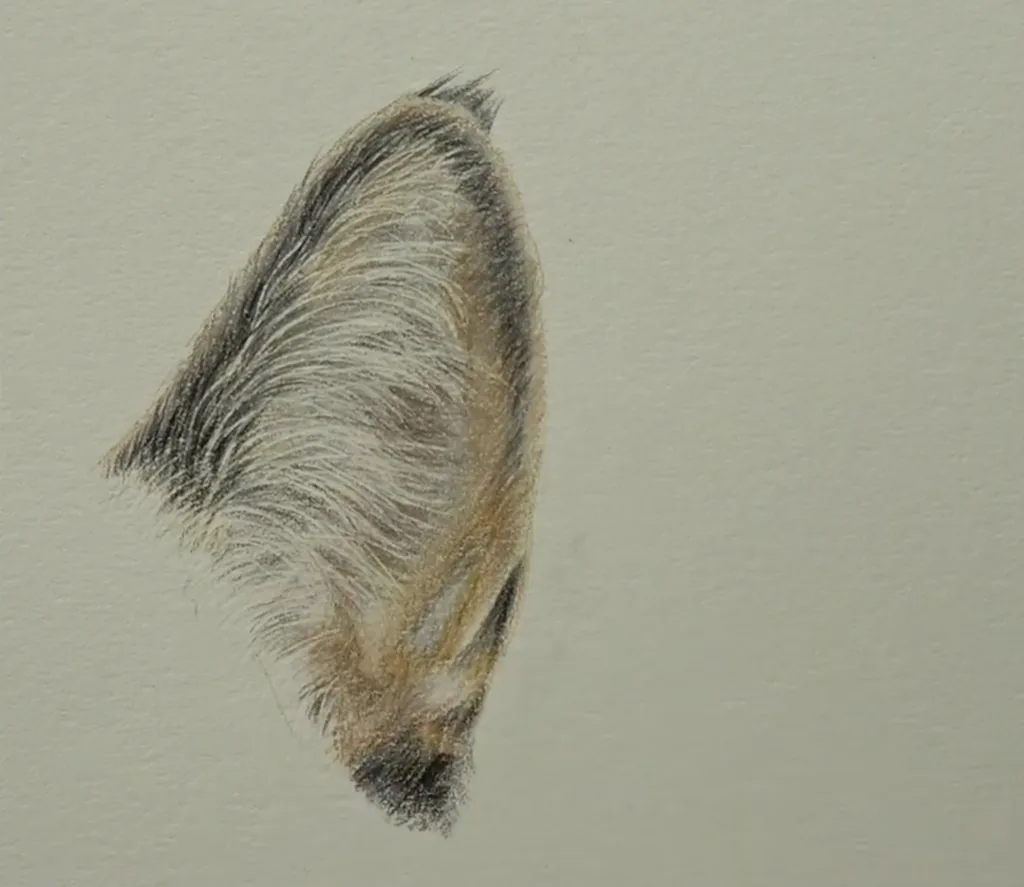
How to draw cat ears step-by-step
Step 1. Transfer the line art for the cat ear
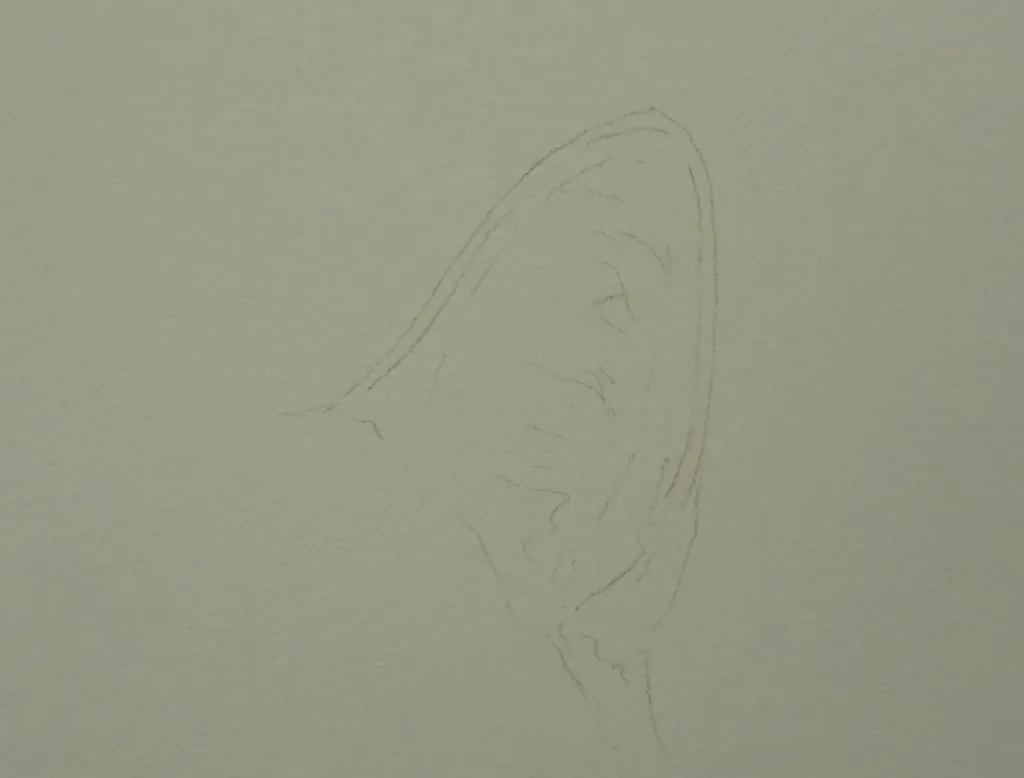
We’ll start by getting the shape of the ear onto your paper, which gives you a faint outline to follow when you press in the hairs. If you’ve never transferred line art before, my guide on how to trace and transfer your line art has a video where you can watch me do it.
- Print my line art at the size you’d like your ear to be.
- Turn the printout over and cover the back with graphite (the grey “lead” in an ordinary pencil), making sure you’ve covered all the lines.
- Lay it graphite side down on your paper, and hold it in place with some tape.
- Trace over the outline with a sharpish pencil until you can see a lovely faint outline on your paper.
Keep your pressure really light while you trace. If you press too hard, you’ll indent the paper, and any line you press in will show up pale once the colour goes over it. Have a good look at your outline next to the reference photo before you move on, because it’s much easier to change the shape now than once the hairs are in.
Step 2. Practise your pressure before you start the ear
Before you press any hairs into your ear, have a little play on a spare corner of your paper. Indenting takes a bit of getting used to, because it’s all about how hard you press, and a few practice lines will show you what your paper needs.
Press some short lines into the corner with your embossing tool, like little hairs. You’ll barely be able to see them at first, and that’s exactly how they should look. Now colour gently over the top with a light brown pencil. The lines will appear as white hairs, and the harder you pressed, the more they’ll stand out.
You’re looking for Goldilocks pressure, not too hard and not too soft! If you press too lightly, the hairs vanish under the colour, and if you press too hard, you’ll hurt your wrist and could damage the paper. It can take a few goes to get the feel for it, and that’s completely normal.
Step 3. Press the white hairs into the ear
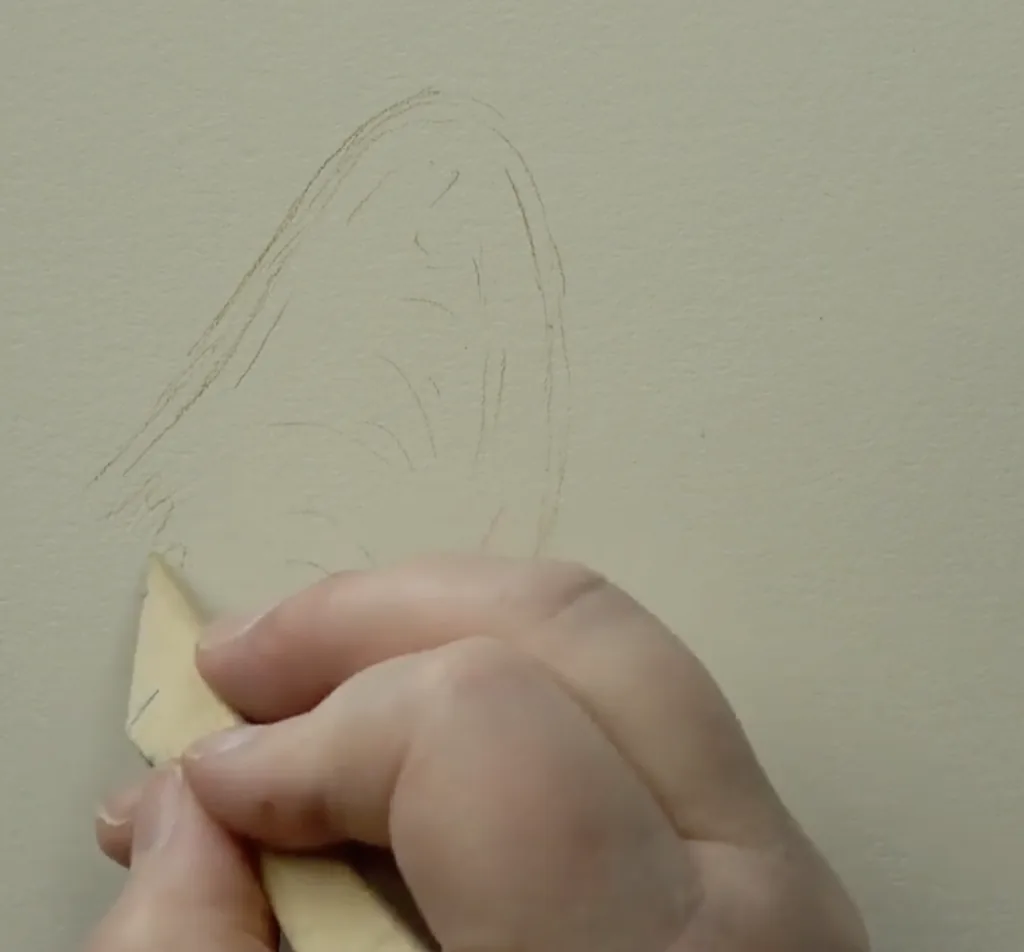
Now we’ll press the white hairs into the ear, before any colour goes on. Each line you press in leaves a tiny dent in the paper. When you colour over it later, your pencil skips over the dent, and the line stays white. If you’ve ever wondered whether the white hairs go in first or last, this is your answer!
- Have a good look at your reference photo and notice which way the hairs grow. Press each hair in the same direction as the hairs in the photo, because it’s very easy to get a little bit gung-ho and carried away.
- Start at the bottom of the ear with your wooden clay tool or embossing tool, holding it like a pencil.
- Press the hairs in with quick little flicks, working up the ear and over the top. Let a few stray hairs come in over the edge, the way they do in the photo.
- Use medium to hard pressure, the same as on your practice corner.
- Keep going until the ear is full of hairs. You’ll need a few extra than you’d expect, because too few can look a little bit straggly. More is more here!
It’s quite hard to see what you’ve done at this stage, and the hairs will start coming to life once the colour goes over them in the next few steps.
Step 4. Add the first colours to the ear
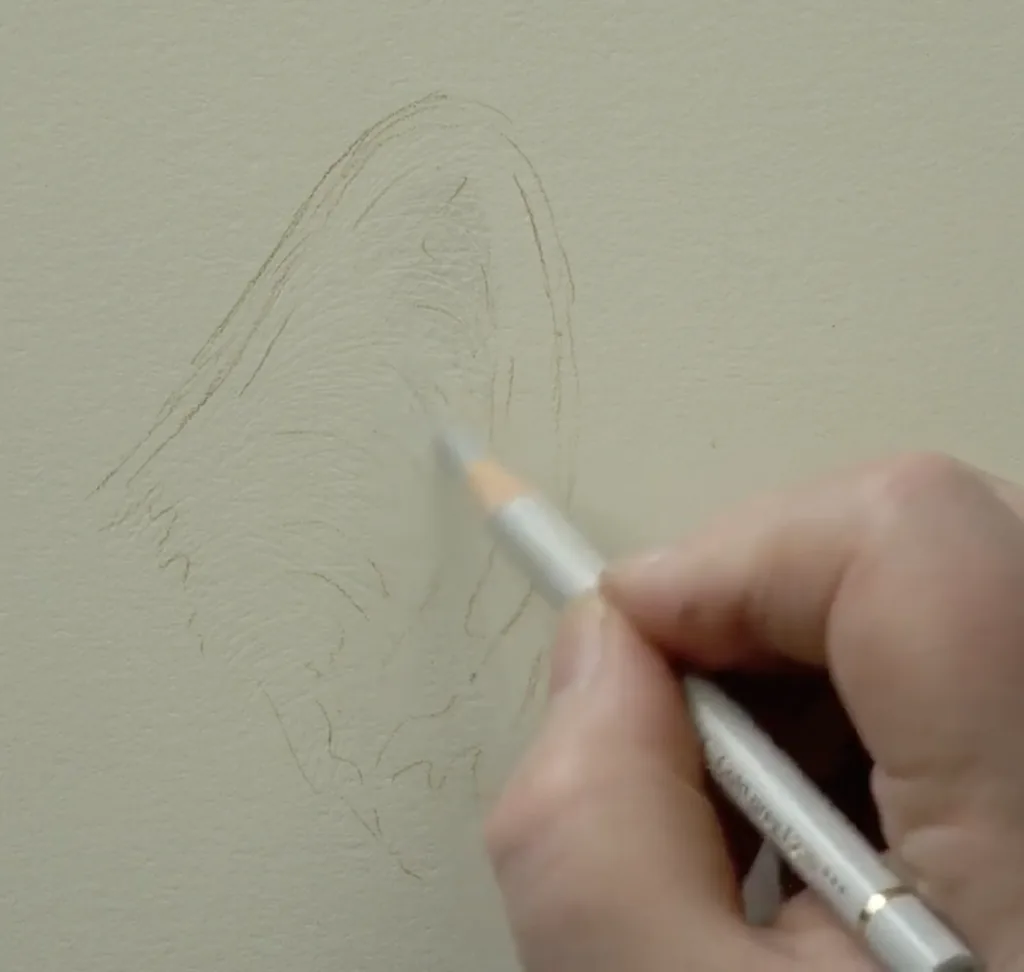
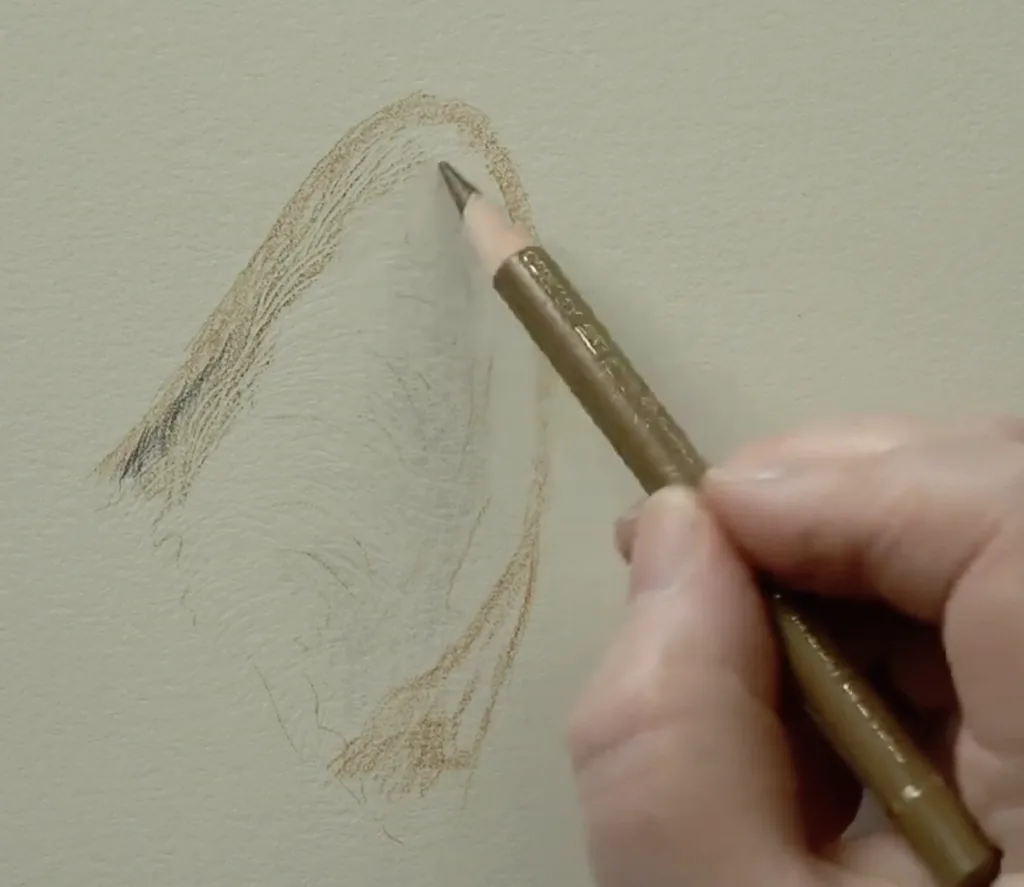
Your first layer of colour is a pale grey in the middle of the ear and a warm orange around the edge. It gives the ear some shape before the darker colours go on.
Take your Cold Grey and colour over the middle of the ear, where the photo has that soft bluey colour. Use light to medium pressure and small round strokes. It’s fine to be a little bit scribbly here, because all we want at this stage is the colour in. As the grey goes down, you’ll see it pick up some of the light.
Next, take your Burnt Ochre and work it gently around the edge of the ear, starting at the top. Follow the edge down to where it gets paler, then pull a little of the orange along the bottom.
You’ll start to see a bit of structure in your cat ear drawing now, which is great!
Step 5. Draw the darker hairs and tufts on the ear
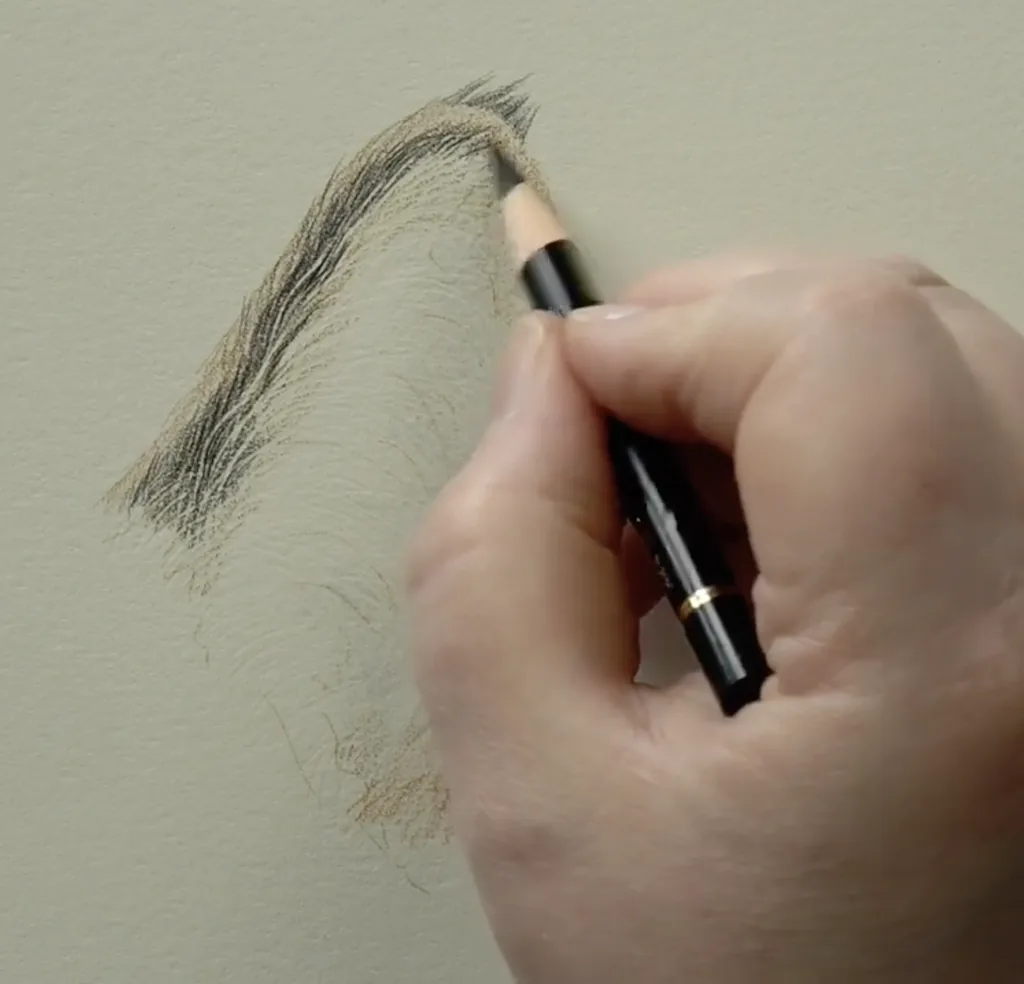
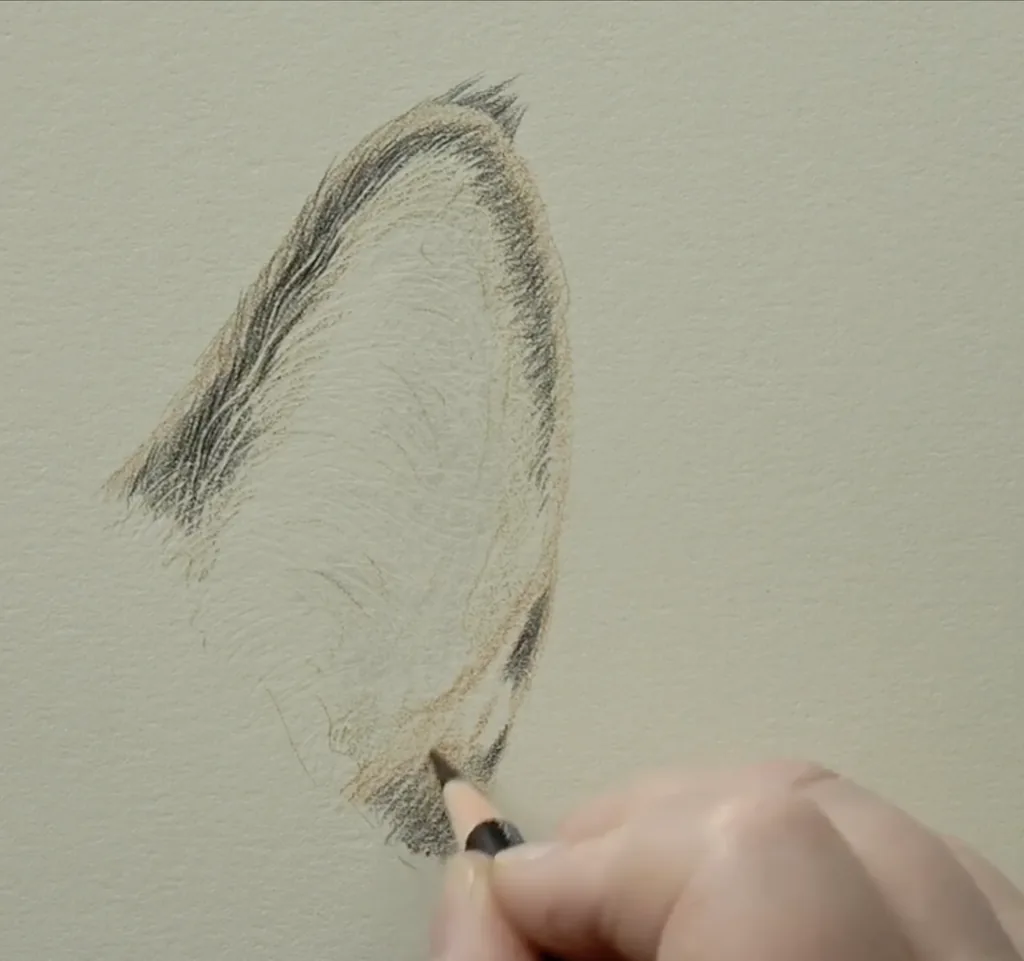
Next, add the darker hairs with Raw Umber and black. As the dark colours go in around the white hairs you pressed in, you’ll start to see your white hairs a lot better.
- Take your Raw Umber and pull it gently into the darker parts of the ear, working up to the top. It’ll start to pick out some of the hairs you pressed in.
- Now take your black and draw little hairs up the shape of the ear, following the direction they grow. Let a few of them run over into the orange. I don’t usually use black on its own, because it can look a bit flat, but it’s absolutely fine for these little hairs.
- For the tufts at the top of the ear, put your pencil down, then flick it and lift it off. This gives each hair a tapered end, like the hairs in your photo.
- Bring some darker hairs down the edge of the ear, using a little more pressure as you go.
- Go over the darker parts again with Raw Umber, and you’ll see more of the white hairs come through.
Stick with these few colours for now, and it won’t feel too overwhelming. If this is your first time drawing hair like this, you’ll be surprised at how quickly you get the hang of it.
Step 6. Add pink and grey inside the ear
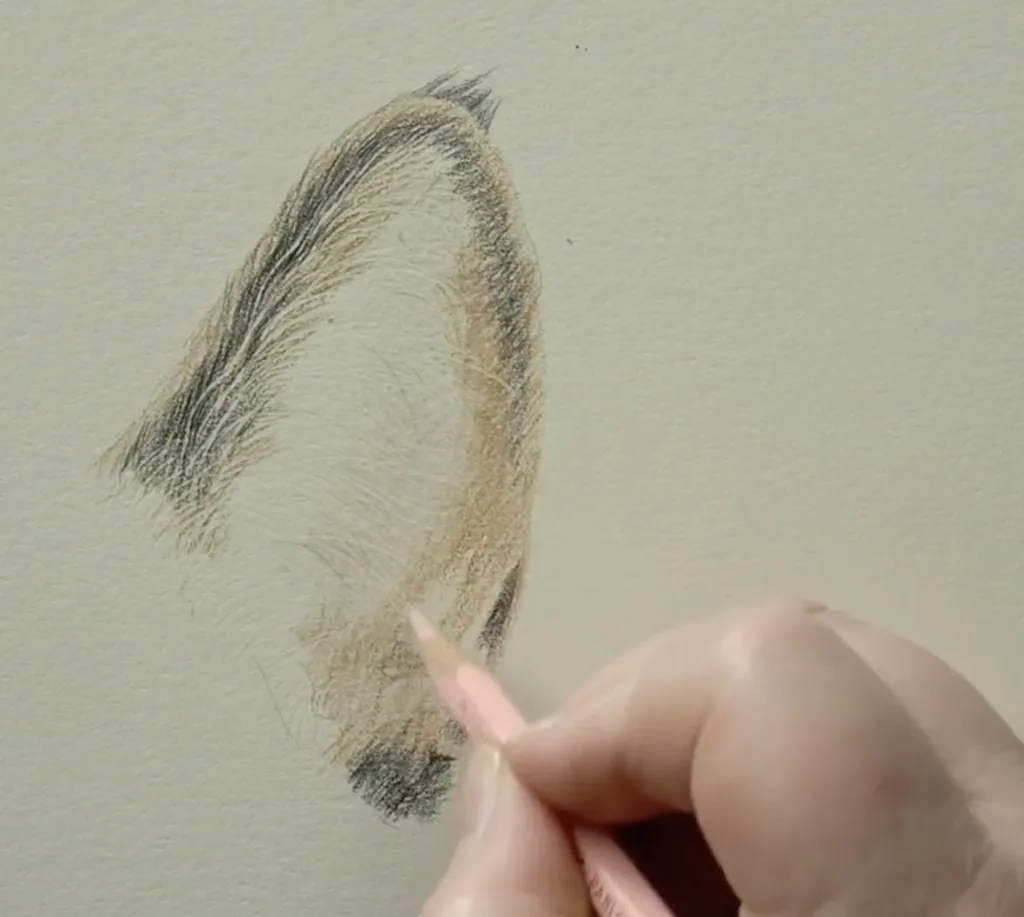
A little pink and grey inside the cat’s ear will warm it up and show off more of the white hairs.
Start with your grey. Gently darken the edge of the ear, moving your pencil backwards and forwards. We’re only shading here, and the detail comes later.
Next, take any pink you’ve got and colour a little into the inside of the ear. The pink, browns and oranges all work really nicely together. Press a bit harder with the pink in a few places. We call this burnishing, and it squashes the brown into the paper and makes it look warmer. Leave some brown showing, though. You don’t want the whole ear to go pink!
Then take your mid grey and add the darker bits inside the ear. You’ll see the white hairs start to show up now.
If your ear looks pretty similar to mine at this point, you’re well on your way.
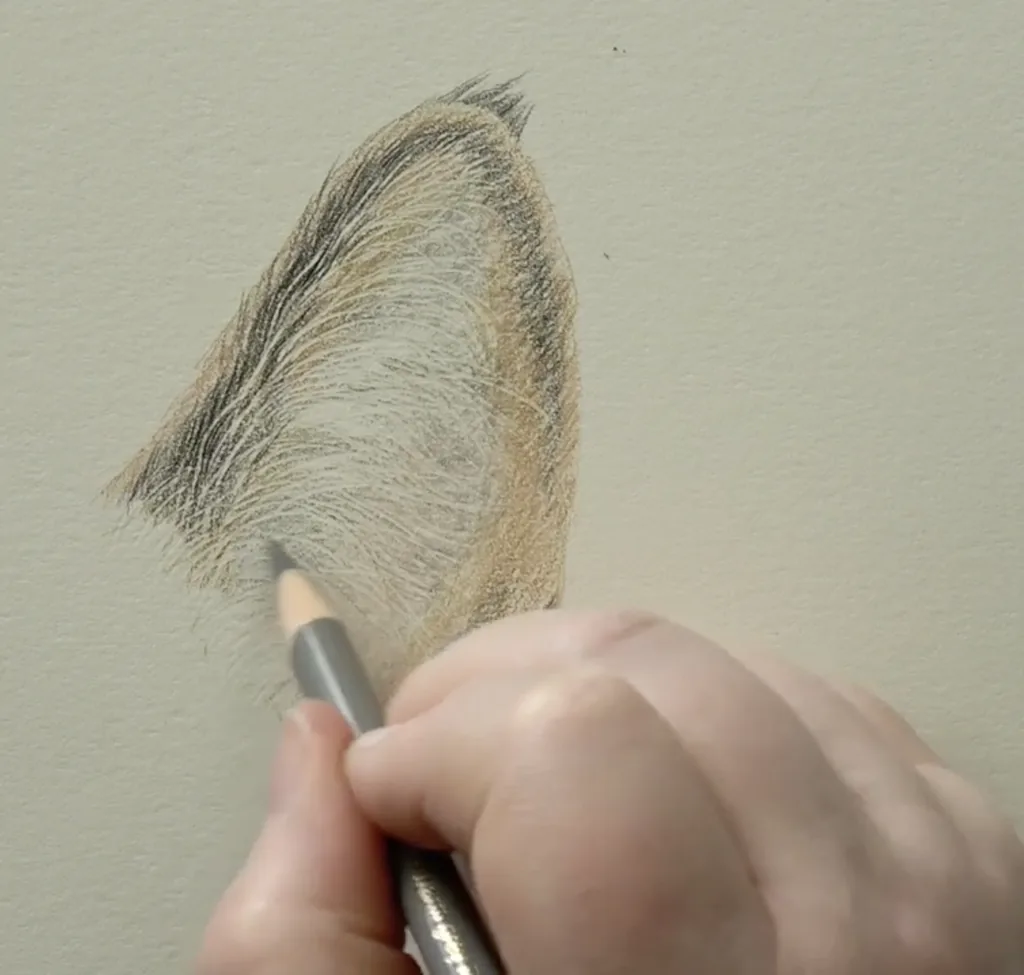
Step 7. Burnish the ear and add the final details
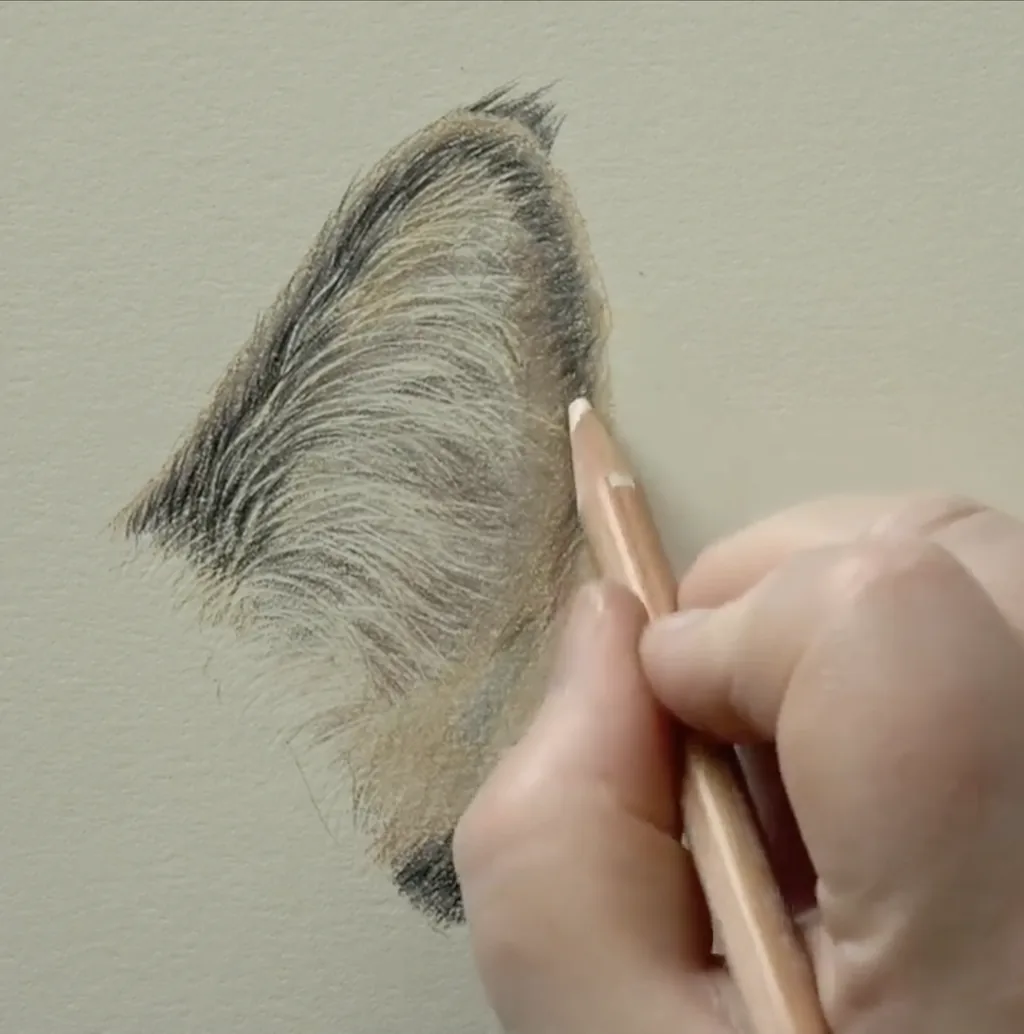
To finish your cat ear, burnish over all the colours with a soft white pencil, then add the darkest hairs on top. Burnishing softens all the layers you’ve built up, and your black will look even darker over the top of it.
- Take your Buff Titanium, or any soft white pencil. It doesn’t need to be sharp.
- Press quite hard and go over all the colours you’ve put down, including the darker areas. You want to squash the colour into the paper, without making your wrist ache. The colours will blend and soften a little, but they won’t disappear.
- Go back in with your black on the darkest hairs.
- Add a few more little hairs around the edge of the ear, and give each one a slight curve.
- Add touches of darker brown or Burnt Ochre wherever the ear needs them, then burnish again to soften. You can still add more layers over the top after burnishing.
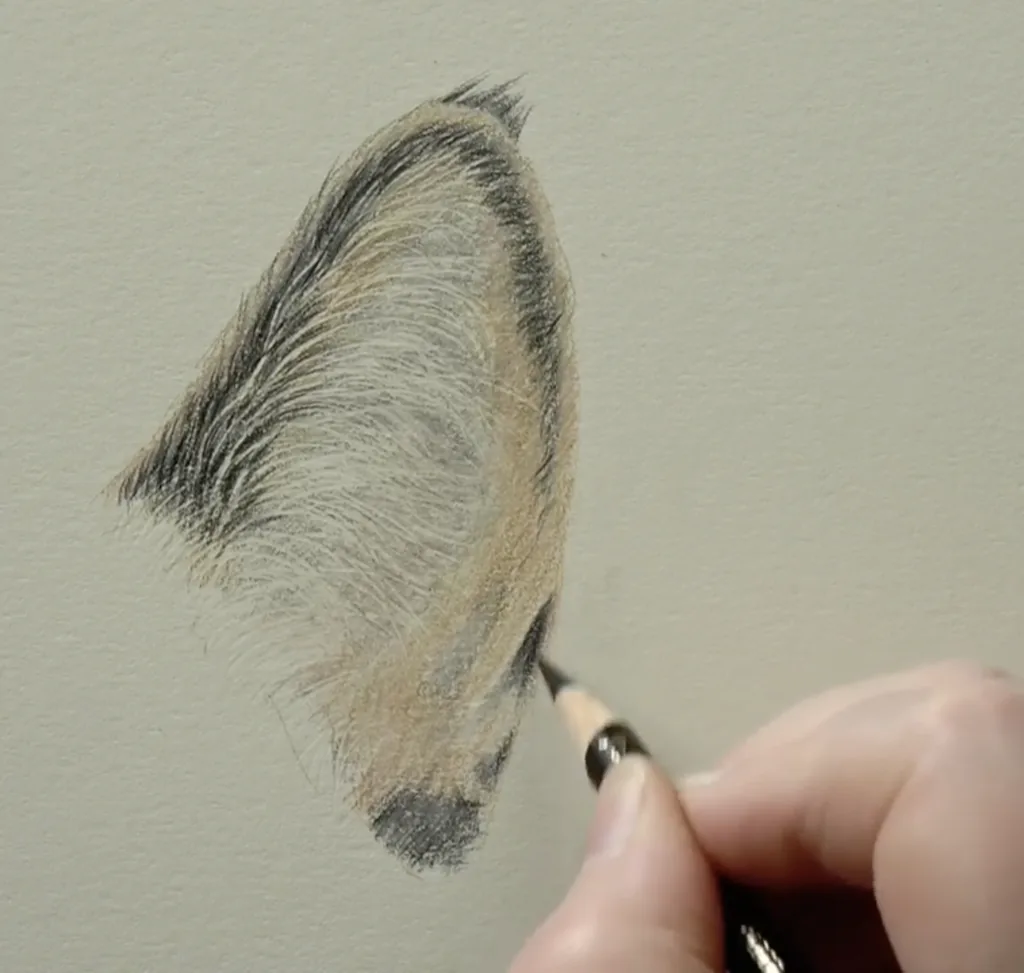
And there you have it, a realistic cat ear in coloured pencil, drawn in a reasonably short space of time!
My tips for drawing realistic cat ears
Indenting is quite a simple technique, and it’ll give you a really nice feel for what your pencils can do. If your ear isn’t looking quite how you’d like, one of these fixes should help.
- If your colour looks a bit gritty, burnish over it with a lighter pencil. Even smooth paper has some texture (we call it the tooth), and it can show through your colour. Pressing hard with a pale pencil fills it in and smooths everything out.
- If your black hairs look too harsh or a bit flat, go over them gently with a darker brown. Black on its own can look flat, and a little brown pulled over the top softens it.
- If you’d like your ear to look more polished, give it more time. I drew this one quite quickly to show you the technique, but you could easily spend a couple of hours on an ear this size, working it up nice and gently and slowly.
Once you’ve got the hang of indenting, you can use it on the rest of your cat, and it’s great for whiskers too. If you’d like to try the wispy hairs in a cat’s ear another way, my post on creating soft fur with a Tombow Mono eraser and Slice tool shows how I bring them out with a blade on drafting film.
Keep drawing with me in Ignite
Once you get going with your pencils, you may well get the bug and want to learn more and more. When you’re ready, you can start on some of the more in-depth techniques and put them together with what you’ve learned here, and create realistic drawings of your own.
Welcoming new students into Ignite, my coloured pencil membership, is one of my favourite things. It’s where I teach you the techniques, all about colour, and the confidence to make creativity part of your life. If you’re just getting started, you’ll begin with my signature course, which I created specifically for beginners, and you’ll always know your next step.
Every week you can draw with me live, and my tutorials come with step-by-step videos, line art and a materials list. You’ll also get monthly critique sessions, confidence coaching and Q&As.
I only open the doors to Ignite a few times a year. Join the waitlist, and you’ll be first to know the moment it opens again.
Comments +