


Pencil pressure is one of those things we don’t always think about when we first start drawing, but it makes SUCH a difference to what we can do with our coloured pencils.
It affects how we layer our colours, the values we can create and how much control we have over our drawings.
And if you’ve ever got a few layers into a drawing and thought, “Why won’t any more pencil go down?” there’s a good chance pressure has had something to do with it!
So, how hard should you actually press?
For most realistic coloured pencil work, start with light to medium pressure for your early layers, then gradually increase your pressure as you build your values. Save your firmest pressure for those really deep darks and any burnishing towards the end of your drawing.
There isn’t one pressure you should use all the time. The important thing is learning how to move between light, medium and firm pressure depending on what your drawing needs.
Why does coloured pencil pressure matter?
When I’m creating realistic coloured pencil drawings, I’ll use everything from the lightest, featheriest touch through to firmer pressure in some of my darkest areas.
But for those initial layers, I tend to work between light and medium pressure.
That’s because coloured pencil realism relies heavily on layering. We build colours over one another to mix them, develop our values and gradually create depth.
If we press too hard too early, we make that much more difficult.
Pressure and layering really do go hand in hand, so if this is something you’re still getting to grips with, have a read of my guide to layering coloured pencils to create realism in your artwork too.
What happens if you press too hard with coloured pencils?
Paper has a texture to its surface called tooth, which gives the coloured pencil pigment somewhere to sit.
As you apply heavier pressure, you begin to squash that tooth down. Do that too early and you have less surface available to accept your next layers.
You might notice that:
- It becomes harder to add more colour.
- Your pencil starts to slide over the surface.
- Areas begin to look shiny.
- You struggle to deepen your values.
- Your colours don’t layer and mix as easily.
This is why I encourage you to keep those first few layers lovely and light.
Light pressure isn’t about making everything pale. It’s about giving yourself room to build.
The surface you’re using makes a difference too, so my guide to the best drawing surfaces for coloured pencil art is worth a read if you’d like to understand your paper a little better.
One pencil can create LOTS of different values
This is one of my favourite things to demonstrate.
Take one dark coloured pencil.
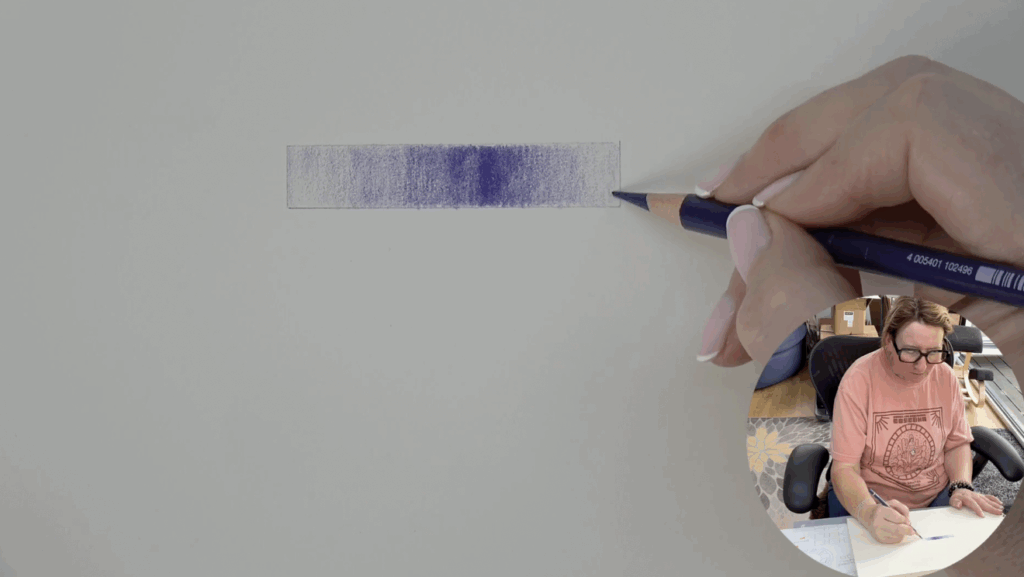
With feather-light pressure, you can create a really pale value. Gradually increase your pressure and that same pencil becomes darker and darker.
Eventually, with firm pressure, you can create a wonderfully deep value – all without changing your pencil.
So pressure isn’t simply about how hard you’re pressing. It’s another tool we can use to control our tonal values.
And values are SO important for creating form, depth and realism in our drawings.
How you hold your pencil can help
Your pencil position will often naturally change as you alter your pressure.
When I’m using very light pressure, I tend to hold my pencil a little further back from the point and at more of an angle.
As I increase my pressure, my fingers naturally move closer to the point and the pencil becomes more upright.
If you struggle to get that really light touch, try moving your hand slightly further away from the pencil point and see how that feels.
You don’t have to hold your pencil exactly like I do – just start noticing what YOUR hand does.
Try this simple pencil pressure exercise
One of the easiest ways to practise is with a pressure bar.
Grab one pencil and a scrap of your usual drawing paper.
Start with the lightest pressure you can possibly manage (and I mean feather, feather, feather light!).
Gradually increase your pressure as you move across the paper until you reach a much darker value.
Then try going the other way.
Once you’re comfortable, try:
Light → medium → hard → medium → light
This time, keep your pencil on the paper and practise changing your pressure as you move.
It sounds simple, but becoming comfortable moving between different pressures gives you so much more control when you’re actually drawing.
What if you’re naturally heavy-handed?
Some people naturally draw with a really light touch. Others pick up a pencil and immediately put a bit more welly into it!
Neither is wrong.
I’m naturally quite light-handed, but that doesn’t mean everyone needs to draw like me.
What matters is being able to control your pressure so you can choose when to work lightly and when to increase it.
And if you regularly think, “I’ve gone in too hard and now I can’t get any more layers on,” that’s simply a little clue that pressure might be something worth practising.
If you’re fairly new to coloured pencils, my five top tips for beginners starting their coloured pencil journey will help you with some of these other fundamentals too.
When should you use heavier pencil pressure?
Heavy pressure isn’t something we need to avoid completely.
You might use it to strengthen your darkest values, create a really deep shadow or burnish an area towards the later stages of your drawing.
The important thing is that you’re using that heavier pressure intentionally, rather than starting every layer that way.
Think of pressure as a range you can move through rather than an on/off switch.
And if you’d like to see how pressure and layering work together, watch my How to Layer with Coloured Pencils video on YouTube, where you can see how those lovely light layers gradually build into richer colour and depth.
So, how hard should you press with coloured pencils?
As a quick guide:
- Light pressure – use for your early layers, lighter values and whenever you want to leave plenty of room to build more colour.
- Medium pressure – use as you build your layers, strengthen your colour and develop your values.
- Firm pressure – save for your deepest darks, stronger final layers and burnishing towards the end of your drawing.
You’ll move between all three as you draw. The trick isn’t finding one ‘perfect’ pressure – it’s learning when to use each one.
Comments +